lisibo – Page 95 – ¡Vámonos!
 

Author: lisibo

Los guapos

| Leave a comment

And for those of you who are not in the least bit interested in football, but watch for the ‘aesthetic appeal’…

[youtube http://www.youtube.com/watch?v=rr9R_XosGgw&hl=en]

Who’s your favourite?

¡España!

| Leave a comment

I know that Euro08 actually kicked off last Saturday, but for me, it all starts tonight when Spain take on Russia. As the only house in the street displaying a flag in the window (how different from previous football tournaments – and a little sad!, you can’t miss my allegiances. At least without England, I have the loyalties of my children too. Well, half of the eldest’s as he is rather fond of Cristiano Ronaldo. Husband is supporting Turkey – less said about that the better.

So in honour of the kick off at 5pm, and to get you in the mood ….. ;o)

To help you recognise the some of the players (I don’t think Raúl is quite past it yet though!)
[youtube http://www.youtube.com/watch?v=_ZjPqfE3wbA&hl=en]

Having missed a few tasks, I’m really pleased that the Whitehouse Common Primary have contributed to this month’s task for Voices of the World.

The May task is the last one for this academic year and is based around saying Goodbye.

Firstly, we recorded a goodbye greeting in Spanish using Voki– AC_Voki_Embed(300,400, ‘6378d6a5e17b42acb60fc7bd78074a50’, 471963, 1, ”, 0);

Get a Voki now!

Then we went around the school taking snapshots to show the other participants what our school is like. We uploaded them to Photostory3 to make a slideshow.

Finally, 4AT listened to and watched all the Voki produced by the other participants and, using the microphone on my laptop (still having issues with microphones at school), recorded the various greetings. And what a great job they did!

Once we’d added a funky soundtrack, the presentation was completed and uploaded to Teachertube for all to see!

Here it is – hope you enjoy it!

I’m back!

| Leave a comment

.flickr-photo { border: solid 2px #000000; }.flickr-yourcomment { }.flickr-frame { text-align: left; padding: 3px; }.flickr-caption { font-size: 0.8em; margin-top: 0px; }

Having had a lovely ten days enjoying the sun, sea, sand, sights, sounds and cerveza in Spain ( I know it begins with c- say it like an Andalucian!), I’ve just got back to rainy England – not very impressed, I can tell you.

I’ve been catching up with emails and reading this evening – as well as emptying and loading the washing machine several times.

Normal service will be resumed shortly – I may have been on holiday, but my brain didn’t completely seize up and there are several posts floating around up there!

So, to help me re-acclimatise, here’s a picture of where I’ve been –
¡ojalá que estuviera todavía allí!

Updated – all resources that still exist for this unit of work can be downloaded here. Hyperlinks within the post to resources in DocStoc no longer work.

As we near half term (and not a moment too soon!) the time has come to report back and evaluate how the four QCA Spanish units I’ve used have gone.

First up is Unit 5 Los Cuatro Amigos which I used with Year 3. It’s based around the story of four animal friends (hence the title) who find an apple tree and have to work together to reach and eat the lovely red apple that hangs on it. You can download the unit from the QCA site and below is the medium term planning that goes with the QCA document.

Scheme of work for Year3 spanish summer – los cuatro amigos

I had been sent a PPT presentation of the story by a kind person on the ELL-forum so we began by me reading the story from the IWB to the pupils and seeing how much they could understand-

  • what’s it about?
  • who are the characters?
  • any words you think you might recognise? how?
  • what do you think this might mean?

Then we picked out the words for the animals and added actions suggested by the pupils whilst looking at flashcards (on the IWB and laminated ones!) – again, thanks to another kind on a forum. I ‘d modified them slightly to be double sided with just the image on one side and the word (colour coded by gender) and image on the other side. The lesson continued with pupils showing their understanding through using the actions as we once more read the story. Already, the class were wanting to join in – especially with the ¡Pom, pom, pom! and ¡Yupí! sections!
To finish off, I’d prepared a simple worksheet with copying and drawing activities based on the new vocabulary.

worksheet lesson 1

The next lesson started with a recap of the story, using the actions once more to show understanding. As we reviewed the animal vocabulary, we discussed the grapheme / phoneme links for ll, j and z and tried to think of other Spanish words that included them – lots of colours and people’s names were suggested. Then, as suggested in the QCA document, we looked at the word galopa and picked out the other action words, using the pupils’ knowledge of sentence structure etc from their own language,their ability to pick out cognates and their understanding of how animals move! They were a bit puzzled by how sheep move but a bit of acting soon helped them catch on to running. We then used a flipchart to link words and pictures, guess the hidden animal / word etc.

Lesson 3 we revised colours – lots of pupils recalled these well, but many of the ones they remembered weren’t featured in the story eg azul, verde, amarillo. We looked for items of that colour in the room, played ‘Búscame algo …..‘ and then focussed on the story with questions about the colour of the apple and animals. WE did the suggested Hoop game making a Venn diagram with two hoops and putting words from the text into the hoops, their position dependent o
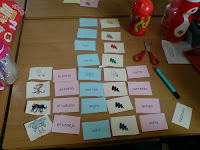
n whether they contain ‘e’ or ‘i’ sound – if both, they went in the intersecting area.
eg oveja = e
ratoncito = i
conejito = e and i
The lesson carried on with a game of pelmanism – animal and word, and then coloured splodge and word. This is always a popular activity :o)
We used the same cards then to make phrases about the animals’ movement – eg el caballo + galopa.
Then once we had successfully done this, I asked the pupils to make phrases including colours. This was intially less successful as several pupils used English word order ie gris + el caballo + galopa (adjective noun verb) rather than el caballo + gris + galopa (noun adjective verb). However, once I drew them back to the text, they remembered last year when they all told me about word order being ‘odd’ in Spanish.

animalcolourverbwordcardsSpanish1

The next language focus was on how to make a sentence negative. Asking questions like ¿Un caballo galopa?, ¿Un ratón salta?, I modelled answers including and no and the more confident worked out how to reply in a phrase rather than by using gesture (thumbs up or down) or a single word. We wrote all the animal names and actions on mini whiteboards (allowing spelling practice too) then added some with and no, and made human sentences. I asked the question, we answered as a class and then the boards got in the right order. As confidence grew, we asked the question as a class and pupils with boards got up and ordered themselves depending on what the answer should be. And then we added additional vocabulary items, explained through mime such as baila – dances or canta – sings. This led to a riotous game of charades!

action verbs – Get more College Essays

The next week I departed from the QCA a little and planned to do a listen an order exercise with pupils listening to the story and putting cards into order according to what they heard. However, 3AB had other ideas and wanted to do it themselves. So I gave them the cards of cut up text and off they set, trying to put it into order. Some were more successful than others and but I was pleased to be able to discuss with pupils what they were doing, how they had a
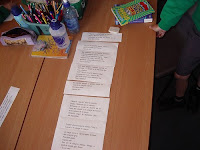
rrived at their answers and also how they might review the order by looking at certain words. After 10 minutes, I read the story and the groups checked their order, making adjustments as necessary.
At this point, my plan had been to look further at the text and see if pupils could identify missing words from their memory. However, once more I adapted to the mood of the class who were really eager to tell the story and record it. Julia volunteered to start eh story, and never really stopped! You can listen to her beautiful storytelling with the class doing the choral parts with great gusto and me adding the odd bit on our podcast (you can see it in the player on the right of this post too). As it was unrehearsed, I was particularly pleased with Julia’s confidence and really quite accurate accent (cogió caused her consistent problem!)

Today was the last lesson on the topic and I lost all but 8 of the class to Area sports trials for half the lesson so we played some games with hoops. Some were not directly related to the topic -such as put your (body part) in the hoop which caused great hilarity; others were based on the vocabulary in the unit. We played a game with the animal flashcards in two different ways:
With the small group, we used the 4 hoops, each with an animal card in it. I called a phoneme eg ‘a’ and pupils had to stand in the hoop that contained a word with that phoneme eg la oveja / el caballo.
With the whole class, we stuck them on the walls and walked (very important as we were in the classroom!) to stand near to the appropriate word. Pupils soon worked out that there was more than one answer possible and we went on to suggest other words containing the same phoneme.

We finished off the topic with another retelling of the story – this time with no pictures – with each table representing one of the animals or the apple. When their animal / apple was mentioned in the text, they had to stand up, and everyone stood up for the apple tree. This was a good test of listening as the word for apple – la manzana and the word for the apple tree – el manzano are very similar.

I consider that the topic has been quite successful – the pupils have enjoyed it and can more accurately identify phoneme – grapheme links thus aiding their pronunciation – and are now self correcting and helping each other with new words. At the start of lesson3 or 4, I asked pupils how many words they could remember from the story and we made a list that filled the whiteboard of words, phrases and whole sentences – and they could spell most of them, and say what they meant. Phrases such as ‘Sí, ya voy‘ and ¿Quién es? are readily recalled now and can be used in classroom situations.

After half term, I teach the other year3 class and will repeat many of the same activities, but will probably add some different ones too, and perhaps explore some further ideas from the QCA document.

Updated – all resources that still exist for this unit of work can be downloaded here. Hyperlinks within the post to resources in DocStoc no longer work.  All of the presentations were shared with me by others -thank you to the kind people who shared – and the story comes from the QCA unit not me! that do not originate from me – thank you to the kind people who shared.

If you are a blogger, website manager or writer, you can now have free access to the online version of the Encyclopaedia Britannica.

As the site says –
It’s a rich trove of reliable and high-quality information that you can use to check quick facts, research topics in depth, or just read to enjoy.

The idea according to their site is that
Britannica covers a wide range of topics with thousands of articles and multimedia features. They’re relevant and useful, and we’d like more people to be able to take advantage of them.

You get complimentary access to the Encyclopædia Britannica online and, if you like, an easy way to give your readers background on the topics you write about with links to complete Britannica articles.

I think this is a good alternative to Wikipedia for online searching, perhaps a little more reliable and factually accurate?

You can embed widgets on your pages too – here’s one labelled Spain. Amused that it featured Las Alpujarras when I grabbed it as I’ll be near there on Thursday! The widget is dynamic so it changes each time you access the page – so a new fact or nugget of information each time you visit, just like my Spanish teacher when I was 13 who told us about something typically Hispanic at the end of each lesson. Sounds good to me :o)

Thanks to @dannynic who pointed me in this direction.

As you know if you read a previous post, I am strangely fascinated by the Eurovision Song Contest. It’s mainly to do with Terry Wogan’s irreverent commentary and the hilarious subtitle bloopers that occur on Ceefax when they instant-translate the hosts speaking rather than the singing which is often dire.

This year, I’ll be away in Spain and will probably let the whole thing pass me by as the two reasons I watch are inaccessible and, more importantly, I’ll have better things to do ;o)

However, I can’t let the occasion pass with out celebration so I was really pleased when Jo Rhys-Jones began a new NING network – The Alternative Eurovision Contest for Schools.
As Jo explains in a post on Talkabout Primary MFL,

‘Have just created a new ning – The Alternative Eurovision Song Contest for Schools – it will incorporate many of the ideas above (Geography, citizenship, ICT, Literacy as well as language links), with set tasks for your class to complete beginning with labelling their chosen country on a Frappr map like the one on this main page and building to our own contest so we can vote on each other’s contributions. I hope it will be in the style of Sharon Tonner’s VOTW with lots of support and help on the ICT side and plenty of flexibility on which tasks you choose to complete and how/when you do them. Then classes should be able to view/listen to each other’s work as the project gradually builds.’

Whitehouse Common have chosen to represent … you’ve guessed it … Spain!
We’ve completed the first task – placing our flag on the Frappr map and are now working on task 2 – a promotional video showing the best of Spain. Plenty of images from which to choose there!

Jo has made a Slideshare full of ideas to help you use the event in your classroom, but why not join the fun on the NING? And it is meant to be fun, I keep reminding myself as I wind up Chris Fuller who has also chosen to represent Spain- may the best entry win… as long as it’s ours ;o)

How many of you knew that today is El Día Internacional de Internet / the International Day of the Internet? Or that this week is Semana de Internet / Internet Week? I certainly didn’t until this morning when I checked BBC Mundo in my Google Reader.

In the article Día mundial de internet, (looking at the day from the point of view of Latin America) it reports that

‘En el día mundial de internet diversos países discuten este sábado el avance de las nuevas tecnologías, y algunos expertos consideran que la clave del futuro de internet en Latinoamérica puede estar en la “creatividad” de su gente.’

(For those who don’t speak Spanish – today different countries will be discussing the advance of technology and some experts will consider the key to the future of the Internet in LatinAmerica as being in the ‘creativity’ of the people.)

The article goes on to say that whilst technology in places like Chile is more advanced than in some European countries, many users don’t fully appreciate the benefits of being online.

“Tenemos el mismo nivel que Europa”, explica Menchaca (el director de Comunicación Digital de la Universidad UNIACC de Chile, quién durante una década lideró proyectos interactivos en España) “pero hay más necesidad de ser creativos”.
“El problema en América Latina es que internet es aún una plataforma para estar y no es visto como una herramienta de servicios, pero creo que los latinoamericanos podrían convertirse en desarrolladores de contenidos para todo el mundo.”

(i.e. the Internet is seen as a platform for ‘being’ rather than as a tool that can be used creatively.)
Universidad UNIACC de Chile has begun a new course linking design, marketing, technology etc together in a more ‘joined up’ way than previously to prepare people to change this view.

I’d encourage you to read the whole article – even if you can’t speak Spanish -for an online translator, Google Translate isn’t too bad you know ;o)

One thing I loved about this article was the news that, in celebration of the day, there is a ‘Torta Virtual‘. Anything to do with cake interests me, so I followed the link and claimed my slice! Very easy to do –

  • Follow the link in the article or this one.
  • Click on the piece of cake you’d like.
  • Upload a picture of yourself.
  • Leave your name, country, town and a message.

You will be emailed your slice of cake and your picture will appe

ar on your part of the main cake.

Why not join in? There were 746 pieces left when I wrote this.

Shame it’s not real though … ;oD


I recently discovered Ben CurtisNotes from Spain blog (via a Tweet from Mark Pentleton I think). The sub heading, Travel -Life -Culture, gives a flavour of what can be found on the site, but doesn’t adequately describe the breadth of information and insight offered. There’s are 3 podcasts, and the excellent Notes in Spanish section quite apart from great and varied blog posts – recent favourites of mine include photos from Spanish fiestas and ferias , a video of the madness of walking El Camino del Rey and a post about the Patios Interiores that brought flooding back the memory of descending two floors to knock on the door of a neighbour I had yet to meet in order to retrieve my smalls that had fallen off the washing line. What an icebreaker that was ;o)

Today when I checked my Google Reader there were two articles , one about news reports from Spain and the other about a new feature of Google Maps which excited me!

Entitled – Kill ten minutes in Spain with Google Maps, it points out the addition of geotagged photos and Wikipedia entries to Google maps. Really interesting and useful too as now it’s possible to look at the physical geography, satellite images, street maps and photos of places (and I’ve just discovered, you can check on traffic in the USA!). And it’s not just Spain – there are images and information from all over the world (the W is for a Wikipedia entry) Year 6 will be my first guinea pigs as we investigate the area around Wasquehal, France in Geography- they’re already very impressed by GoogleMaps and had a great time finding sites in Wasquehal on PlaceSpotting (anyone else doing this unit, there are about 8 or 9 puzzles if you use the search facility and input ‘Wasquehal’)

So I’m now off to do some virtual sightseeing before I really go to Spain next week. (click on the map to make it bigger or go to here.

[googlemaps https://maps.google.com/maps?f=q&hl=en&geocode=&q=spain&ie=UTF8&lci=lmc:panoramio,lmc:wikipedia_en&ll=39.909736,-4.350586&spn=14.482836,29.53125&t=h&z=5&output=embed&s=AARTsJq093neKo-thtF9_LkAgDNU_Gr0Pw&w=425&h=350]

Thanks Ben for the inspiration on this – and for your site which makes me feel so much closer to Spain :o)

Whenever I switch on my laptop or log on to my area of our home PC, I am greeted by my iGoogle page. This contains my Google Reader, my Yahoo mail, a calendar, calculator, the weather forecast and time for Birmingham and Madrid and the headlines from BBC news and CILT as well as more frivolous things like Penguins and Shakespearean Insults. I’ve also got widgets called Quote of the Day and How to of the Day which offer both amusement and food for thought.
Today’s How to of the Day (there are two!) are How to create a butterfly garden and How to make a laptop tote bag. Thought the later looked interesting and wondered if anyone fancied making one? I’m not very handy with a Singer but I guess if it’s only straight lines I might manage. Perhaps something to save for a rainy day ….

Other useful tips offered on the site include all sorts of cheats and hacks, helpful household tips (personal favourite – how to fold a Towel Elephant) and more wacky suggestions such as Turn an old TV into a fishtank.

How to Make a Laptop Tote Bag

from wikiHow – The How to Manual That You Can Edit

At its simplest, a laptop carrying case is little more than a padded tote bag. While it will require some careful cutting and thought out sewing procedures, it is a fairly easy project that a beginner could have success with.

Steps

  1. Select your materials.
  2. Launder and iron the fabrics to be used.
  3. Measure the laptop to be carried. The author used a Cardboard Laptop Case as a guide for size. Measure all the way around the laptop, from the hinge side to the opening, and then back to the hinge, not just the top. This will be the length of the fabric. Then measure the width of the laptop plus each side. This will be the width of the fabric.
  4. Cut two layers of cloth: One layer large enough to cover the laptop all the way around, PLUS an inch (2.5 cm) in every direction, and the other layer half an inch (1 cm) larger than the first all around. One will be the outside and the other will be the lining. They can be the same colors or different, coordinating colors. If the outside layer is a durable water-resistant kind of fabric, so much the better.
  5. Cut two thicknesses of quilt batting the size of your smaller (inner) piece of material.
  6. Cut a layer of interfacing material the size of the smaller (inner) piece of material.
  7. Sew the sides of the outer layer of material, leaving the top open.
  8. Miter the corners.
  9. Sew the tips of the miters to the seam line.
  10. Turn “right side” out and test fit.
  11. Layer the interfacing, batting, and inner material.
  12. Align them carefully.
  13. Quilt the three layers together by hand or by machine.
  14. Sew the sides of the quilted layer, leaving the top edge open.
  15. Clip the batting and interfacing close to the seam.
  16. Miter the corners, sewing the mitered tips to the seam line.
  17. Test fit by sliding your laptop (or box) into the inner layer and then into the outer layer.
  18. Make any necessary adjustments for proper fit at this point.
  19. Clip the inner layer two inches from the edge of your laptop (or box, in this case.)
  20. Clip the outer layer two inches (5 cm) from the edge of the inner layer.
  21. Fold the outer layer twice, once in and over itself and then again over the inner layer and pin for sewing. (This forms a roll of cloth, hiding the raw edges of both layers.)
  22. Sew the layers together along the inside, lower edge of the rolled/folded outer edge.
  23. Cut 4-5 inch (10-13 cm) wide strips for your handles. Make them of a length that is pleasing and comfortable for you (12 inches or 30 cm for a short handle, 24+ inches or 70+ cm for a shoulder strap).
  24. Fold and iron the handle strips.
  25. Top stitch the strips to hold their shape.
  26. Measure the top of your bag and divide by 3. Mark the thirds with pins.
  27. Place your handle ends just outside the pins along the edge.
  28. Pin the handles in place.
  29. Fold the raw ends of the handles under themselves.
  30. Pin in place.
  31. Topstitch the handle ends in place. (It’s zig-zagged across the top edge in pictures, single stitched the rest of the way. Choose whatever appeals to you.)
  32. Trim all threads and there’s your new custom carrying case for your laptop

Modified steps for creating a cleaner looking or more finished project:
As far as the cutting and pre-construction goes, the above steps are very well written and easy to follow; however, if you’re looking to create a cleaner or more finished project you can follow the guidelines below for the assembly of your tote:
There’s a much cleaner way to do this which will hide the attachment of the straps and the raw edge/seam of the inner/outer layer.
When sewing the lining leave a hole in the bottom. Then sew the handle to the lining with right side facing in. To assemble, flip lining right side out with strap/handle on the inside. Put exterior shell inside lining, also with right side out. Sew seam around the top connecting the inside and straps of the bag to the exterior shell.
What you’ll have now is a tote with the lining on the outside (right side out), the exterior on the inside (looking down in to the tote you’ll see the wrong side of the exterior fabric), and the strapped sandwhiched between the two.
So, how do you get it to look like a tote? Remeber the hole you left in the lining? Reach in that hole and grab the strap or exterior fabric and pull it through. That will put the strap and the exterior fabric on the outside (right side out) and the lining on the inside (right side showing). You’ll have to machine sew or hand sew the hole shut in the bottom of the lining. It doesn’t matter if it’s not perfect because that seam will be on the inside of the bag.
If you use batting or foam rubber to reenforce the bag keep that in mind when you’re leaving the hole in the bottom of the lining. You’ll have to pull that bulk through to complete the bag. There is really no right or wrong size for the ‘pull through’ hole. It just depends on the project and materials being used.

Tips

  • This can be done b

    y hand, but is best sewn on a machine.

  • This can be done without padding; see How to Make a Tote Bag.
  • This works very well coordinated with the cardboard laptop carrier’s inner layer and adding this project as the outer layer for greater stability with a ‘finished’ look.

Warnings

  • Depending on the amount of padding you use, this laptop bag may not be as protective as some store bought alternatives.
  • Use appropriate care when handling scissors and needles.

Things You’ll Need

  • Two yards of material. May be a yard each of different materials if desired.
  • One yard of Quilt Batting
  • One yard of interfacing material or similar, thin fabric.
  • Sewing Machine
  • Tape Measure
  • Thread

Related wikiHows

Article provided by wikiHow, a collaborative writing project to build the world’s largest, highest quality how-to manual. Please edit this article and find author credits at the original wikiHow article on How to Make a Laptop Tote Bag. All content on wikiHow can be shared under a Creative Commons license.

¡Vámonos! ©2025. All Rights Reserved.
Powered by WordPress. Theme by Phoenix Web Solutions